

Are you a pizza enthusiast like me? Do you savor the crispy, golden edge of a perfectly baked pizza crust? Well, then you’re in for a treat because in this article, we’re going to delve into the world of Pizza Cornicione.
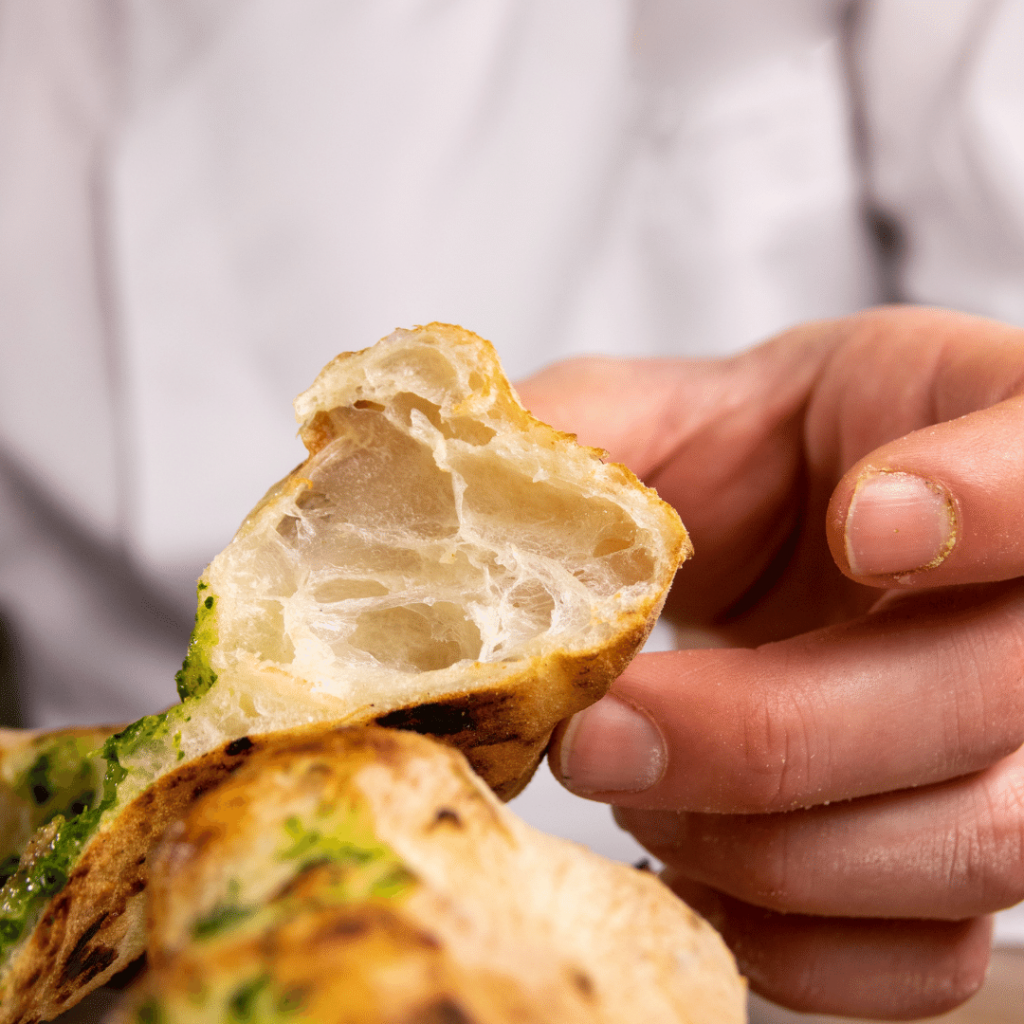
Cornicione might sound like a fancy Italian word, but fear not; I’ll break it down for you in simple terms. Essentially, cornicione is the raised edge of a pizza crust. It’s that delightful, puffy, and airy part of the pizza that isn’t covered by sauce, cheese, or your favorite Italian toppings. Think of it as the pizza’s rim, border, or handle – the part that provides a perfect balance of flavor and texture while giving you a convenient place to hold your slice.
In this article, we’ll explore what exactly pizza cornicione is, what sets it apart in the world of pizza, and most importantly, how to make the perfect cornicione right in your own kitchen. So, let’s dive into the world of this crispy pizza wonder!
What Is Pizza Cornicione?
Now that we’ve introduced the concept of pizza cornicione, let’s dive a bit deeper into what makes it so special.
Cornicione – it might sound like a mouthful, but it’s simply the Italian word for the raised edge of a pizza crust. You can also refer to it as the pizza rim, border, or even the pizza handle – names that allude to its distinct features.
This pizza rim is a unique part of the pizza because it remains uncovered by sauce, cheese, or any toppings. It’s what sets the stage for that perfect blend of crispy and chewy textures, making each bite a delightful experience.
Picture it – a well-baked cornicione is often puffy, airy, and adorned with blistered char marks from the oven. These charred spots contribute to its exceptional flavor, adding a hint of smokiness that pizza enthusiasts adore.
But here’s where it gets really interesting – true Neapolitan pizza, as defined by the Associazione Verace Pizza Napoletana (AVPN), considers the cornicione an indispensable element. The AVPN is an organization that certifies pizzerias worldwide for their adherence to traditional Neapolitan pizza-making rules.
According to the AVPN, a bona fide Neapolitan pizza must boast a cornicione that stands at a modest height of 1 to 2 centimeters, with uniform thickness and a soft, elastic consistency. This ideal cornicione should also display a luscious golden hue, accented by those appealing dark spots from the oven’s heat. And, as a delightful surprise, its interior should harbor large air bubbles, giving it that distinct lightness.
The cornicione isn’t just a structural element; it’s the pizza maker’s signature, reflecting their skills and unique style. It’s also a delight for pizza enthusiasts who relish dipping it in olive oil, garlic, cheese, or sauces, elevating the pizza experience to a whole new level.
How to Create the Perfect Cornicione on Your Pizza
Now that you’re acquainted with the essence of pizza cornicione, let’s embark on the journey to crafting the perfect one in your very own kitchen. Achieving that crispy, puffy, and flavorful edge comes down to four key factors: gluten development, long fermentation, shaping and stretching, and baking.
These factors are not just mere steps in the pizza-making process; they are the cornerstones that determine the structure, flavor, and appearance of your cornicione and, consequently, the overall quality of your pizza. So, let’s explore each of these elements in detail, ensuring that your next homemade pizza boasts a remarkable cornicione.
1. Gluten
Let’s kick off our journey to the perfect cornicione by delving into the crucial first step – gluten development.
Gluten is a protein that comes to life when flour and water join forces in your pizza dough. It’s the unsung hero of pizza crusts, providing the dough with the strength, elasticity, and remarkable ability to trap air. These qualities are precisely what you need to achieve a cornicione that’s delightfully puffy, airy, and adorned with those tantalizing blistered spots.
Think of gluten as the scaffolding of your pizza crust, holding it together while allowing it to expand and rise beautifully in the oven. It’s this interplay of strength and flexibility that will make your cornicione a star attraction on your homemade pizza.
So, remember, when it comes to crafting that perfect cornicione, gluten is your trusty ally, working behind the scenes to make your pizza dreams come true. Now, let’s move on to our next step on the journey to pizza perfection.

What is Gluten?
Before we proceed further into the world of gluten development, let’s take a moment to understand what gluten actually is.
Gluten is not a single entity; rather, it’s a composite of two distinct types of proteins – gliadin and glutenin. Together, these proteins form the dynamic duo responsible for the magic that happens in your pizza dough.
- Gliadin is the protein that bestows upon your dough its extensibility – the remarkable ability to stretch without snapping or breaking. It’s what allows you to effortlessly shape your pizza dough into that desired round and thin crust.
- On the other hand, glutenin is the counterpart that imparts elasticity to the dough. It’s what gives your dough the resilience to spring back to its original shape after you’ve stretched it, ensuring that your cornicione retains its form.
The intriguing part is that the ratio of gliadin to glutenin isn’t a one-size-fits-all affair. It actually plays a pivotal role in determining the dough’s unique balance between extensibility and elasticity. And, as you might have guessed, this balance is a crucial factor in achieving the perfect cornicione.
So, there you have it – a glimpse into the world of gluten, a fundamental player in crafting that irresistible cornicione. Now, let’s proceed on our quest for pizza perfection.
Why You Need Gluten
Now that we’ve grasped the essence of gluten, let’s explore why it’s an absolute must when it comes to crafting that perfect pizza cornicione.
Gluten, as we’ve come to understand, is the linchpin responsible for a host of desirable attributes in your pizza dough:
- Air Bubbles Galore: Gluten plays a starring role in creating a captivating network of air bubbles within the dough. These little pockets of air are destined for greatness, as they expand and rise magnificently in the oven’s heat. It’s this very process that gives your cornicione its signature puffiness and light, airy texture.
- Shape and Structure: Ever wonder why your pizza doesn’t turn into a shapeless puddle when you stretch it? Thank gluten for that. Gluten’s elasticity ensures that the dough retains its intended shape and thickness when you stretch and bake it. This elasticity is like a doughy insurance policy against unsightly deformities, ensuring your cornicione remains intact.
- Flavor and Color: Gluten contributes not only to the texture but also to the flavor and appearance of your cornicione. During baking, gluten undergoes a delightful transformation, partaking in the Maillard reactions and caramelization processes. This results in that appealing browning and a mouthwatering aroma that characterizes the perfect pizza crust.
So, in a nutshell, gluten isn’t just a passive ingredient in your pizza dough; it’s the dynamic force behind the creation of your cornicione’s texture, structure, flavor, and visual appeal. It’s no wonder it’s a vital component in crafting that ultimate pizza experience. Now, let’s continue our journey to perfecting the art of cornicione creation.
Flour
Choosing the right flour for your pizza dough is a pivotal decision that will significantly impact the quality of your cornicione. The type of flour you use directly influences both the amount and quality of gluten in your dough, and this, my fellow pizza aficionado, is where the magic begins.
Here are the key considerations when it comes to pizza flour:
- Protein Content: The main factor to keep a keen eye on is the protein content of the flour. This protein is the very building block of gluten formation. Simply put, the higher the protein content, the more gluten your flour can yield. And more gluten means a dough that’s strong, elastic, and ready to give you that coveted puffy cornicione.
- Protein’s Impact: Flour with a higher protein content results in a dough that’s robust and resilient, perfect for holding its shape and texture. Conversely, flour with lower protein content will yield a dough that’s softer and more extensible, making it easier to stretch and shape.
So, what’s the sweet spot for pizza cornicione? Ideally, you want a flour with a medium protein content, typically falling in the range of 11 to 13%. This balance provides just the right amount of gluten to create that dreamy puffy and airy cornicione without crossing the line into toughness or chewiness.
One of the most popular choices for crafting the perfect cornicione is Type 00 flour. This finely milled Italian flour typically boasts a protein content ranging from 11.5 to 12.5%. Additionally, it has a low ash content, which means it contains fewer minerals and impurities that might interfere with the color and flavor of your cornicione.
If you can’t get your hands on Type 00 flour, don’t fret. You can also opt for all-purpose flour or bread flour, which often have similar protein contents. Keep in mind that they might have a slightly coarser texture and potentially a higher ash content, but they can still deliver an excellent cornicione.
However, not all flours are created equal, and there are some you should avoid for cornicione perfection. Cake flour and pastry flour, for instance, have very low protein contents and will likely result in a flat and dense cornicione that won’t live up to your pizza dreams.
Similarly, steer clear of whole wheat flour or rye flour. While they have high protein contents, they also contain bran and germ, which can interfere with gluten formation, resulting in a heavy and dark cornicione.
So, there you have it – your flour selection plays a pivotal role in the quest for the perfect cornicione. Now, let’s keep the momentum going as we explore the next steps on our journey to pizza greatness.

How to Develop Gluten in Pizza Dough
Now that we’ve covered the importance of gluten and the right flour, let’s delve into the art of gluten development – a critical aspect of achieving that perfect cornicione.
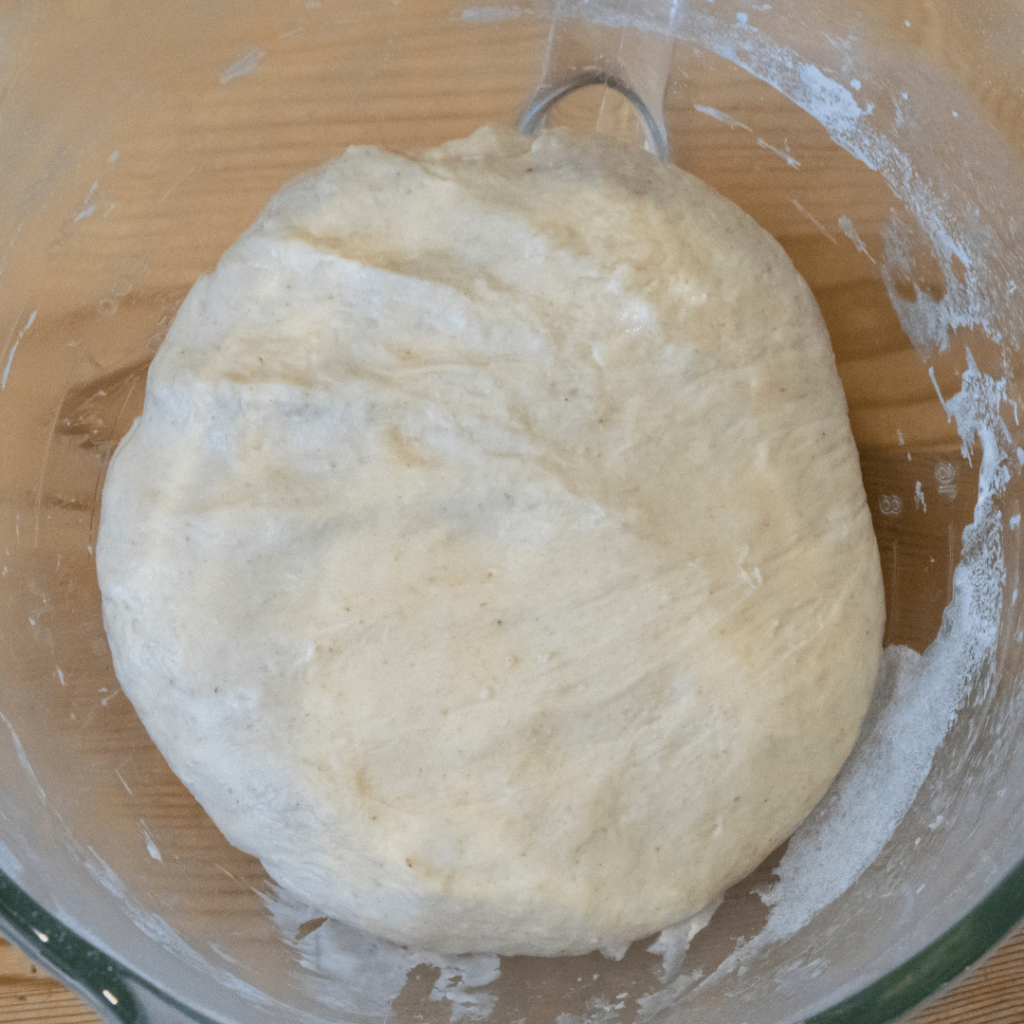
To coax gluten into its full potential, you’ll need to follow three key steps: mixing, kneading, and resting. Here’s how each of these stages contributes to the development of gluten:
- Mixing: This marks the initial phase where you bring together the flour and water, and optionally incorporate other ingredients like yeast, salt, and oil. Mixing can be carried out either by hand or with the assistance of a machine, such as a stand mixer or a food processor. During this process, the flour hydrates, and the gluten proteins begin to align and bond together. This is the foundation upon which your cornicione’s texture will be built.
- Kneading: Kneading is the workout session for your dough. It involves stretching, folding, and pressing the dough repeatedly. Whether done manually or with a machine, it’s important not to overdo it, as excessive kneading can lead to a tough and inelastic dough. Kneading serves a dual purpose – it strengthens the gluten network, ensuring the dough’s structural integrity, and creates more of those coveted air bubbles, contributing to the delightful lightness of your cornicione.
- Resting: After all that action, it’s time for your dough to take a breather. Resting involves allowing the dough to sit for a specific period, either at room temperature or in the refrigerator. This step is not just about downtime; it’s crucial for gluten development. During this period, the gluten gets a chance to relax, and the dough begins its ascent. It’s also a time when yeast fermentation and enzymatic activity within the flour kick into gear, enhancing both the flavor and texture of your dough.
So, there you have it – the roadmap to developing gluten in your pizza dough. These steps may seem simple, but they are the building blocks that lead to that dreamy, airy, and flavorful cornicione. As we continue our journey towards the perfect pizza, remember that patience and precision are your allies in this endeavor.
2. Fermentation
Our journey to the perfect cornicione continues with a step that adds complexity and depth to your pizza’s flavor profile – long fermentation.
Fermentation is the process where the sugars in the flour undergo a transformation, thanks to the action of yeast. This miraculous process not only plays a pivotal role in creating a flavorful cornicione but also contributes to its airy and light texture.
Let’s explore the two primary methods of fermentation: bulk fermentation and proofing:
- Bulk Fermentation: This is the initial phase where the entire dough is left to rise in a large container for several hours or even days. It’s like the dough’s slumber party, allowing it to mature and develop its unique character. During this time, the yeast works its magic, producing organic acids and esters that infuse the dough with complexity. It’s also a time when the yeast and enzymes in the flour diligently break down starch and gluten into simpler, more digestible molecules.
- Proofing: The dough then enters its second phase, known as proofing. Here, the dough is divided into portions and shaped into individual balls, which are left to rise for a few hours before baking. This stage further refines the dough’s flavor and texture, contributing to the cornicione’s ultimate appeal.
The longer the fermentation period, the more pronounced the flavors and aromas become. It’s akin to aging a fine wine or cheese – patience yields exceptional results.
To achieve long fermentation, you have a few options:
- Use a small amount of active dry yeast or fresh yeast.
- Embrace the world of sourdough by using a sourdough starter, a mixture of flour, water, and wild yeast and bacteria.
Bear in mind a couple of factors for successful fermentation:
- Temperature: Maintain an optimal temperature between 20°C and 25°C (68°F and 77°F). Too high or too low temperatures can affect yeast activity and survival.
- Humidity: Keep the dough in an environment with 75% to 85% humidity. This ensures proper dough hydration and evaporation.
- Protection: Cover the dough with a damp cloth or plastic wrap to prevent it from drying out or forming a crust on the surface.
- Punching Down: During bulk fermentation, consider punching down or degassing the dough once or twice. This releases some carbon dioxide and redistributes the yeast and nutrients within the dough, promoting even fermentation.
3. Shaping and Stretching the Dough to Create the Cornicione
Now that we’ve mastered the art of gluten development and long fermentation, it’s time to dive into the next crucial step – shaping and stretching your pizza to create that distinctive and inviting cornicione.
Shaping and stretching the pizza is where your culinary finesse comes to the forefront. Here’s how you can master this essential process:
- Method of Choice: Shaping and stretching can be accomplished using either your trusty hands or a rolling pin. However, if you want to preserve those precious air bubbles and the dough’s elasticity – traits that make for a perfect cornicione – I recommend the hands-on approach.
- Three Key Steps: When shaping and stretching by hand, follow these three fundamental steps:
- Rounding: Begin by gently shaping the dough ball into a smooth and tight sphere. Achieve this by tucking and pinching the edges of the dough underneath. Rounding creates a uniform and compact structure in the dough, setting the stage for even rising during proofing.
- Flattening: Press the dough ball into a flat and round disk using the palms and fingers of both hands. This process not only establishes the basic shape of your pizza but also plays a pivotal role in defining the cornicione. By leaving a slightly thicker border around the edge of the disk, you’re setting the foundation for that delightful, raised rim.
- Stretching: Now comes the magic of stretching. Expand the dough disk into a larger and thinner circle, utilizing the back of your hands, your knuckles, or even your fists. Stretching not only finalizes the shape and size of your pizza but also works wonders for the cornicione. It introduces more air pockets and surface area within the dough, contributing to its light and airy texture.
- Dimensions to Aim For: To achieve that perfect cornicione, aim to shape and stretch your pizza to a diameter ranging from 25 to 35 cm (10 to 14 inches), with a thickness of 3 to 4 mm (0.1 to 0.2 inches). This dimension range strikes the ideal balance, ensuring your cornicione is neither too thin nor too thick, achieving that coveted puffy yet delicate texture.
- Work Surface and Transfer: Always work on a lightly floured surface to prevent the dough from sticking. Once you’ve skillfully shaped and stretched your pizza, transfer it to a peel or a baking sheet dusted with semolina or cornmeal. This extra step ensures your pizza easily slides into the oven without any mishaps.

4. A Scorching Hot Oven!
The final act in our quest for the perfect cornicione is a culinary spectacle in its own right – baking the pizza to golden perfection in a scorching oven. This stage is where the magic happens, and every detail counts.
The Oven Environment
Baking the pizza entails subjecting it to intense heat in a dry environment, whether you’re using a conventional oven, a convection oven, or the revered wood-fired oven. This pivotal step is the crescendo in creating a cornicione that dreams are made of.

The Triple Play: Oven Spring, Browning, and Crispiness
- Oven Spring: As soon as your pizza enters the fiery embrace of the oven, something remarkable occurs – oven spring. This is the rapid expansion of the dough in the first few minutes of baking. It’s brought to life by the evaporation of water and the explosive release of carbon dioxide trapped within the dough. Oven spring is the secret behind the puffiness and airiness that define the cornicione. The outcome heavily depends on factors such as oven temperature, humidity, and air circulation.
- Browning: While the dough undergoes its transformation, another enchanting process takes place – browning. This is the color change of the dough during baking, triggered by the Maillard reactions and the caramelization of sugars and proteins within the dough. Browning isn’t just for appearances; it’s the guardian of flavor and aroma. Its outcome is influenced by baking time, temperature, and the ingredients within your dough.
- Crispiness: Lastly, we arrive at crispiness, the ultimate texture transformation. The dough undergoes dehydration and gelatinization of starch and gluten as it bakes. This creates the hallmark crunch and bite of a perfect cornicione. The thickness, hydration, and oil content of your dough all play pivotal roles in determining the level of crispiness achieved.
Mastering the Heat
- Ideal Temperature: The ideal temperature for baking a pizza with a perfect cornicione lies between 450°C and 500°C (840°F and 930°F). This scorching heat is the key to achieving rapid oven spring, impeccable browning, and the crispiest of crusts. However, many home ovens cannot reach these temperatures, so aim for the highest heat possible, typically around 250°C to 300°C (480°F to 570°F).
- Baking Duration: The pizza should be baked for approximately 5 to 10 minutes, although this can vary depending on oven temperature, pizza size, and toppings. It’s essential to keep a close eye on your creation as it bakes.
- Rotation: Rotate the pizza once or twice during baking to ensure even cooking and browning. This simple step can make a significant difference in the final result.
- Doneness: The telltale signs of a perfectly baked pizza are a golden cornicione with some dark spots and cheese that’s melted and bubbly. It’s a visual and aromatic symphony that you’ll come to recognize and cherish.
Use the Highest Heat Possible
When it comes to achieving the perfect cornicione, one golden rule stands tall: the hotter, the better. The ideal temperature for baking a pizza with a cornicione that dreams are made of falls between a scorching 450°C and 500°C (840°F and 930°F). At these extreme temperatures, the pizza undergoes a rapid and intense transformation that’s simply unparalleled.
The Benefits of Extreme Heat
- Fast and Intense Oven Spring: A scorching oven creates a fast and intense oven spring. This explosive expansion of the dough in the first few minutes of baking results from the rapid evaporation of water and the dynamic release of carbon dioxide within the dough. It’s this oven spring that gives birth to the puffiness and airiness that define the perfect cornicione.
- Impeccable Browning: Extreme heat is the catalyst for impeccable browning. As the Maillard reactions and caramelization of sugars and proteins occur within the dough, the pizza transforms into a visual and aromatic masterpiece. Browning doesn’t just affect appearance; it’s the heart and soul of flavor and aroma.
- Ultimate Crispiness: When it comes to achieving the ultimate crispiness, extreme heat is your ally. The dough undergoes dehydration and the gelatinization of starch and gluten, resulting in a cornicione that’s crunchy on the outside and tender on the inside. The thickness, hydration, and oil content of your dough all come into play, creating that perfect bite.
Adapting to Home Ovens
Now, it’s a well-known fact that most home ovens can’t quite reach the inferno-like temperatures of a traditional wood-fired pizza oven. Fear not, for there’s a next-best option. Aim to use the highest heat possible within the limitations of your home oven, which typically falls in the range of 250°C to 300°C (480°F to 570°F).
Timing Matters
Remember, with higher heat comes a shorter baking time. In general, the pizza should be baked for approximately 5 to 10 minutes. However, this can vary based on factors such as oven temperature, pizza size, and the toppings you’ve chosen. To ensure even cooking and browning, be sure to rotate the pizza once or twice during the baking process.
The Ultimate Goal
Keep a watchful eye on your pizza as it bakes, and remove it from the oven when you spot that telltale sign of perfection – a cornicione that’s beautifully golden with some dark spots, and cheese that’s irresistibly melted and bubbly.
So, there you have it – the secret to a perfect cornicione lies in embracing the highest heat your oven can muster. With these insights, you’re ready to embark on a journey to pizza perfection. It’s time to preheat, bake, and relish in the delights of your homemade masterpiece!
Use a Pizza Stone or Pizza Steel
When it comes to achieving that coveted perfect cornicione, one of the best-kept secrets in the world of pizza-making is the use of a pizza stone or a pizza steel. These unassuming kitchen tools can elevate your pizza game to a whole new level.
The Role of a Pizza Stone or Pizza Steel
So, what are these magical devices, and how do they work their wonders? Well, a pizza stone is typically a flat and thick piece of ceramic, while a pizza steel is its metal counterpart. These indispensable tools are placed in your oven and preheated for at least 30 minutes before baking your pizza.
Here’s how they work their magic:
- Heat Source and Heat Sink: Pizza stones and pizza steels act as both a heat source and a heat sink. During the preheating process, they absorb a substantial amount of heat from your oven. This stored heat is then radiated back onto the pizza as it bakes, ensuring a consistent and intense heat source from below.
- Mimicking the Wood-Fired Oven: The real magic lies in their ability to mimic the effects of a wood-fired oven, which is known for its hot and dry floor. The heat conducted by the stone or steel creates a hot and dry surface, just like the floors of traditional wood-fired pizza ovens. This, in turn, contributes to the creation of a perfect cornicione.
The Benefits
Using a pizza stone or pizza steel offers several key benefits:
- Uniform Heat: They distribute heat evenly, helping to ensure that every inch of your pizza crust receives the same intense heat treatment.
- Crispy Bottom: The hot surface they provide results in a beautifully crispy bottom crust, a hallmark of an exceptional cornicione.
- Quick Cooking: The intense heat from below encourages rapid cooking, which is essential for achieving that perfect cornicione.
- Authentic Texture: By replicating the conditions of a wood-fired oven, they help create a pizza crust with an authentic, rustic texture.
How to Use Them
Using a pizza stone or pizza steel is straightforward:
- Preheat: Place the stone or steel on the middle rack of your oven and preheat it to the highest temperature your recipe suggests (usually between 450°C and 500°C or 840°F and 930°F).
- Transfer and Bake: Once your oven and the stone or steel are sufficiently hot, carefully transfer your pizza onto the heated surface using a pizza peel or another suitable tool. Then, let the oven work its magic.
A Perfect Cornicione Awaits
So, whether you opt for a trusty pizza stone or a robust pizza steel, you’re on your way to creating the perfect cornicione. These kitchen heroes bring the heat, mimic wood-fired oven conditions, and elevate your homemade pizza to a level that’s sure to impress even the most discerning pizza connoisseurs. Preheat, bake, and savor the results – your perfect cornicione awaits!
Pizza Cornicione FAQs
What exactly is a pizza cornicione?
A pizza cornicione is the raised edge or crust of a pizza. It’s the part of the pizza that’s not covered by sauce, cheese, or toppings, and it often features a puffy, airy texture with char marks from the oven.
Why is the cornicione important in pizza making?
The cornicione is crucial because it adds texture, flavor, and balance to the pizza. It’s also a defining feature of Neapolitan pizza, and its quality reflects the skill of the pizza maker.
What type of flour is best for achieving a great cornicione?
For a perfect cornicione, choose a flour with a medium protein content, ideally around 11 to 13%. Type 00 flour is a common choice for its finely milled texture and protein content of 11.5 to 12.5%.
How do I prevent my cornicione from becoming tough or chewy?
To avoid a tough or chewy cornicione, be mindful not to overwork the dough during kneading, and use a flour with the appropriate protein content. Additionally, ensure that your oven temperature and baking time are within the recommended range.
Can I make a great cornicione without a pizza stone or pizza steel?
While a pizza stone or pizza steel can enhance your cornicione, you can still achieve great results without them. Using a hot oven and following the other key steps can help you create an excellent cornicione.
What is the difference between pizza crust and cornicione?
Pizza crust and cornicione are related but distinct parts of a pizza. The crust refers to the entire outer edge of the pizza, including both the raised cornicione and the flat base beneath the toppings.
Is the cornicione found in all types of pizza, or is it specific to certain styles?
The cornicione is a defining feature of Neapolitan-style pizza and is prominent in many traditional Italian pizza styles. However, other pizza styles may have variations in the crust, and the prominence of the cornicione can vary.
Why is it called cornicione?
The term “cornicione” comes from the Italian language. In Italian, “cornicione” refers to the raised edge or border of something.